Friday 20 December 2013

WEEK 13 (Industial Day)

So this day, was the day that we waiting for. Our presentation on this project was running perfectly and smooth. All of our friends are doing well to. Thank you very much to our supervisor that willingly to handle us as their fyp student for diploma and he also help us on many ways to complete this project and our report to. We also thank to our friends that give support to do this project because this is our first time doing a project that hard for us to handle it. 

Moment :D


Sunday 1 December 2013

WEEK 12 (REPORT PREPARERATION)

On this week, we do our report for this project. All the result and analysis that we get must have in the report. We do together all the chapters from introduction until the result including the methodology of this project. But first we must draft the report and give it to our supervisor to check of our content and format of this report. After that we have made changes for mistake of format and content, then we have to print it out and make two copy of hard cover of the report to send it to library and to our supervisor to fulfill our assessment on this project.

Friday 29 November 2013

WEEK 11 (POSTER AND PAMPLET)

This day we had last briefing for Final Year Project for this semester. The requirement that needed went presenting this project at Gemilang Hall is a poster and pamplet. These were an outline of our poster and pamplet that we did for this project before present it to our assessor soon.


Monday 25 November 2013

WEEK 10 (FINAL ASSEMBLY)

On this week, we are trying to figure out on creating a box for the circuit and also a motor that we want to attach to the food tank. Other than that, we have to buy Poly pipe PVC, tuperware ,hot glue gun ,perspex , a small aquarium and cardboard to create this protype of fish feeder. Here were the picture of final assembly and the prototype of this project .


Wednesday 20 November 2013

WEEK 9 (RESULT)


After completing the project, it is tested and the result is show in picture below. Each circuit has difference output which is related to each other. The 4060 IC circuit is the main circuit on this project. Means that, if there is a problem on the 4060 circuit, then the other will be effected too. The astable 555 IC also depends on the 4060 timer. If not, the motor will be not running.

Behaviour of Output Signal

We can see that the Astable 555 IC will start counting when the output of 4060 IC goes HIGH. Then, when the complete counting, the output will LOW for a second and it will goes HIGH again. The HIGH and LOW output can be set-up by replacing the resistor and capacitor. The Monostable output will goes HIGH when the Astable output LOW. The output will goes HIGH depends on the value of resistor and capacitor. The monostable output is representing the duration of motor running. 

Saturday 2 November 2013

WEEK 8 (TROUBLESHOOTING)

After we complete the process of drilling and soldering, we have to tested and troubleshoot the circuit. Find the problems that found and tried to solve it. 

The problem that we found is the amount of food can’t be control. So after study the circuit operation and do some research about the IC’s. After the input is given by the adapter which is DC 6V~12V, the first IC’s which is 4060 get enough power to operate. The IC 4060 is 14-bit counter which will count and give output to timer directly. The IC 4060 sending pulses by “1” means high and “0” low. So, the timer operate when output from 4060 show high which is “1”.But, its seem like the timer does not working at all. It seem that ouput from IC 4060 doesn’t enough power to operate the timer directly.

            So, in litte bit of theoretically and also practically, to allow timer get enough power, put between them an IC 7411 which is AND gate. The AND gate function as multiplier of the high and low input which is “1” and “0”. As example, when AND gate get input which “1” and “0”. The ouput will become “0” and when the input get “1” and “1”, the AND gate output will become high which is “1”.

            So, in this case to achieve enough power for timer operate is the input AND get connected from output 4060 and VCC to keep one of the input stay high. When 4060 counting and sent high output to AND gate and the high output from AND gate will send to the timer which cause timer to operate the motor which is control the amount of food to feed the fish. 

We attach some of picture on troubleshooting : 


Wednesday 23 October 2013

WEEK 7 (DRILLING AND SOLDERING PROCESS)

The activity of this week is soldering process. After we have done the etching process, we set up all the component on the PCB board that we have drill all the holes on it. Then we solder each of the components. Here are the picture of our activity :

DRILLING PROCESS

SOLDERING PROCESS

To drill the PCB and solder the components must have take a precaution on doing it. If wrong your PCB or your components maybe damage and it is waste of your time to buy another PCB and one set of the components. Before doing this process, you must have another set of the components and a few of copper board to not wasted your time to go to the shop for buying all of this.

Saturday 19 October 2013

WEEK 6 (PCB PROCESS)

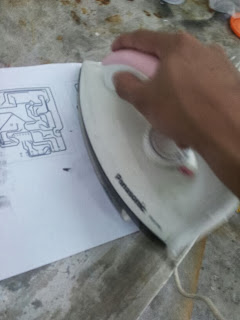
Ot this week, we manage to do etching process. The things that we need to do the process is a Copper board, the printed circuit diagram on plastic paper which is plastic transparent, an iron, hot water and acid for etching process. Here we attach picture of this process : 


COPPER BOARD

IRONING PROCESS
AFTER BEING IRON

ETCHING PROCESS


Monday 14 October 2013

WEEK 5 (PCB OUTLINE)

On this week were are ready for circuit outline first and then go to process of etching of the printed circuit board (PCB). Before that, for the outline we use Diptrace software which is :

DIPTRACE SOFTWARE

This software was easy to us to draw the schematic diagram and change it to PCB form. These is example of the Diptrace software from our schematic :


Monday 7 October 2013

WEEK 4 

SCHEMATIC DIAGRAM AND FLOW CHART OF PROJECT


Before we start to develop this project. Here we attach the flow chart and schematic diagram for this project : 


BLOCK DIAGRAM

SCHEMATIC DIAGRAM

Explanation For Circuit

As the schematic diagram above, we can see that the VCC will enter the switch first. The switch act as the circuit breaker for the whole circuit. When it is normally open, the power supply will not reach the circuit. But, when it is normally close, the circuit will be running. Then, the current will enter the IC 4060 first .

IC 4060 14-bit counter (Binary counter)

IC 4060 is an Oscillator binary counter of it can be as the frequency divider. The basic frequency of the internal oscillator is determined by the value of the capacitor connected to pin 9 and the resistor at pin 10.  Pin 11 can be used to give clock pulses from an external source. By increasing or decreasing the value of capacitor or resistor, time delay can be changed. Each output goes high after the completion of the timing cycle. For this IC, they have 10 output pin which is pin 1,2,3,4,5,6,7,13,14 and 15. Each output have a difference value of time and from one pin to another, the value is multiple by 2. There are some graph diagram that representing the output of each pin at figure 3.2. The RESET pin must be grounded because pulses are enabled when the RESET, pin 12, is connected LOW and dis-enabled, or inhibited, when RESET is connected HIGH. The VCC pin is at pin 16 and the GND at pin 8.

To know about the time for each output pin, there are some calculation to get the exact value of timer.

Formula to calculate the frequency :

RT = Variable resistor on pin 10 and CT = Capacitor at pin 9.

Formula to calculate the period of pulse :
OUTPUT SIGNAL OF 4060


f = Frequency and t = time

About IC 7411 (AND GATE) 

Next, the output from IC 4060 will enter the IC 7411(AND gate). The 7411 IC is a 3 input and 1 output AND gate. The reason why this IC have been chosen because we want to stabilize the output from 4060 IC same value as the VCC. One of the input were connected to the output of the 4060 IC and the rest were connected to the VCC. Then, the output of 7411 IC connect to the IC 555. The VCC is at pin 14 and GND at pin 7.

Pin of 7411 IC :
PIN CONFIGURATION
A,B and C = input, Y = output
IC 555 (Astable) mode

The output from 7411 IC were connected to the one of the parallel resistor at the Astable 555 IC circuit. The parallel of resistor at the Astable circuit is to match the timing ON of the 4060 output. The Astable circuit must be triggered within the 4060 output still HIGH. So, the resistor value must be accurate to make sure the timer for Astable output triggered on time. When the value of resistor is increase, the time of astable circuit to trigger also will increase. Pin 4 and 8 were connected to the Vcc while pin 1 is to the GND. Pin 6 and 2 should connected together than connect to the R3 and C2. The output of Astable circuit is connected to the pin 2 at monostable circuit.

Formula for calculate HIGH time :

Time HIGH (1) = 0.693 x ( R5 + R3 ) x C2

Formula to calculate LOW time :

Time LOW (0) = 0.693 x R3 x C2

Formula to calculate the frequency :

Frequency = 1.44 / (( R5 + R3 + R3 ) x C2

Output wave :
OUTPUT SIGNAL

IC 555 (Monostable) mode

This is the last circuit that function as the timer for motor to running. The duration of motor to running is depends on the resistor (R4) and capacitor (C3) that connected to pin 7 and 8. This monostable circuit must be receive the continuous power supply. But, it will function when the power supply is cut-off for a while. Then, the output will goes HIGH. So, the output from Astable circuit will steadily HIGH and then it will LOW for a while. At that time, the monostable will start function means the motor will running. When the value of R4 and C3 increase, the duration of motor to running will increase. Pin 4 and pin 8 were connected to the VCC while pin 1 is connected to GND.

Formula to calculate the timer :

Time HIGH = 1.1 x R4 x C3

The output waveform :
OUTPUT SIGNAL


Monday 30 September 2013

Week 3 - Final Year Project

Week 3 

On this week my partner and i search some components that we need to build our automatic fish feeder's circuit .So we have go to Jalan Pasar, Kuala Lumpur and buy some of it .


So these are the components that we buy, which are IC 555, IC 4060, DC motor 6V, resistors, capacitors, LEDs and some jumpers/wires including PCB board and also a breadboad .After buy all this, we calculate and make a suitable circuit for our automatic fish feeder .

Wednesday 25 September 2013

Week 2

Introduction : Automatic Fish Feeder

To : Sir Abdul Halim Abd Rahman

Description about the project :

This project is to design a prototype of automatic fish feeder by using logo soft program .My partner and I are being ask to create a fish feeder that can be set the time to feed the fish. Although ,we have been supervise by Sir Halim to search and create a circuit that can be program by the LOGO soft. The program is the main objective in this project because the program will be set, what time should be give to the circuit to feed the fish. In addtion, we still have to use timer and microcontroller to give pulses to the motor through out the relay. Thus, process of this circuit will be complete by using program ,timer and microcontroller .

We have been searching for weeks to gain some of the information on how to design an automatic fish feeder. These are some example of an automatic fish feeder without using LOGO soft :

http://www.instructables.com/id/Automatic-Aquarium-Feeder/

http://www.electronics-lab.com/projects/misc/010/

So here we can build up the automatic fish feeder circuit .We also doing research about the timer that we are using in this circuit .Which is IC 555 .Here are the description about the timer :

http://www.555-timer-circuits.com/pin-configuration.html

So we know that the function of the timer give pulses to the microcontroller and then go to the motor to operate it. Other than that, relay and capacitor also required in this circuit, same as the resistor to operate as decrease the value of current enter to the component or go through the circuit .

This are some of examples of the working system that we found : 

The circuit is using regular timer (IC 555) sending pulse to 2 cascaded counters of CMOS 4017. The output pin from the last counter is then fed to the capacitor and-relay in series. (Remember: a relay owns its own resistance) which consequently trigger the relay for some time to turn on mechanics section. After the capacitor is about to be fully loaded, the relay shuts off. From here we could figure out that the bigger the capacity the longer the relay connects which then causes the motor works to expel pellets centrifugally. The resistor functions to unload the capacitor so that the capacitor is then ready to be loaded for the next cycle. 
Time interval if the IC 555 keeps following the formula:

T(555) = 1,1 x R x C

For short, if we set the timer T = 3 minutes, the both counters will multiply the time to be 10 x 10 = 100 times. So the total time intervals would be T = 3 minutes x 10 x 10 = 300 minutes = 5 hours. To change the time intervals simply is by changes/turning R-Var and for the pellet quantity is by changing C-Var size.

So, that's all for now. Thanks for who shared the information above and we will update more about our final year project next week. 

Please give us a comment to motivate in doing this project :)


Saturday 21 September 2013

Week 1


Hi !!
Welcome to our blog .
This is our first time using blog to make a report for our final year project.

Firstly, I would like to introduce my partner and I.

My name is Muhamad Utbah and my partner name is Muhammad Akram. My partner and I study in University Kuala Lumpur British Malaysian Institute and still pursuing my diploma in eletrical and electronic. This is an official blog for my final project. And you're invited to visit and do comment .

Thank you !